Below is the step-by-step process for processing a misc sale using the POS Style 1.
* Note: The Process Misc Sale process is also accessible through the customer listing window. Select the customer from the list and click Misc Sale  in the lower right corner. The process works exactly the same as below.

| » | Click the Process Misc Sale button to begin the process. |
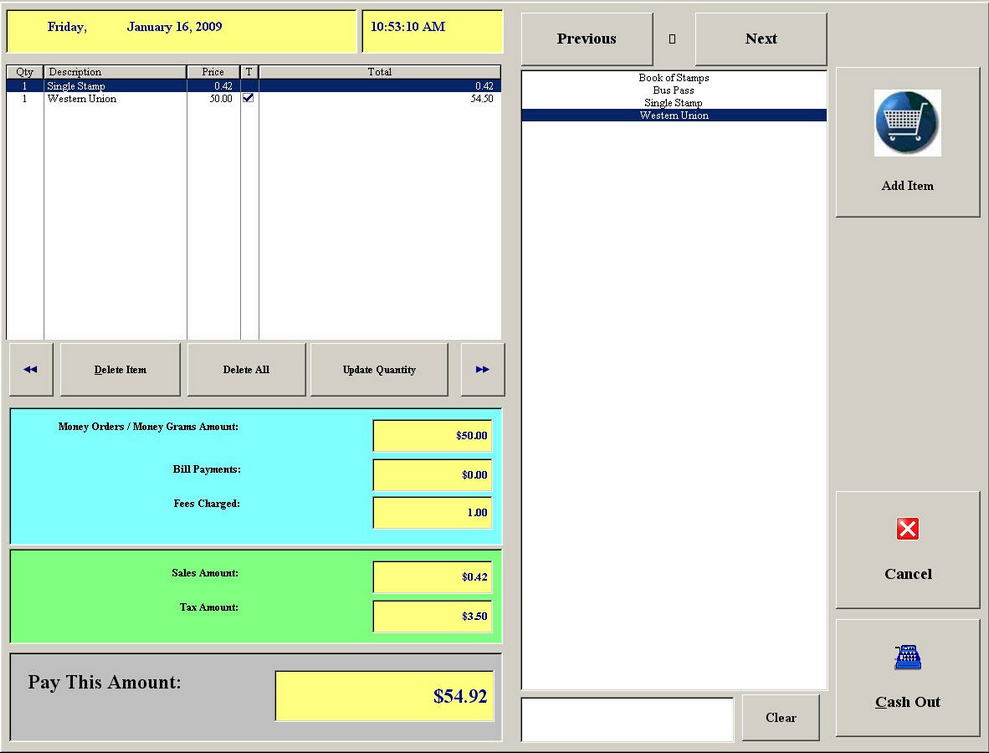
| » | Double click the item/service or select it and click Add Item to add the item/service. To add/edit the items for sale, please see Items/Services For Sale. |
| » | Use the Previous and Next buttons to jump from page to page (if items/services list is more than one page long). |
| » | Use the search box below the items list to search for a specific item/service. Click Clear to return to the entire list of items/services. |
| » | Use the double arrow buttons to jump from page to page if the customer's list of items is longer than one page. |
| » | Items can be deleted by either selecting the item, right-clicking, and choosing Delete Item or by selecting the item and clicking the Delete Item button. Click Delete All to clear the customer's list of items. |
| » | Click the Update Quantity button to change the quantity of the selected item. |
| » | Amounts, fees, and taxes are automatically calculated and displayed as items are added/removed. To edit fees and taxes, please see Items/Services For Sale. |
| » | Click Cancel to close out of the Misc Sale window without processing or saving the transaction in process. |
| » | When satisfied and ready to complete the transaction, click Cash Out. |

| » | Transaction total from the Misc Sale window is displayed at the top. |
| » | Quick Cash buttons represent specific bills received from the customer. As you click these buttons the Cash Received amount is automatically adjusted. |
| » | The keypad to the right can be used to enter in the specific amount received by the customer. Once entered, click one of the four (4) payment options below (Cash, Check, Credit Card, or Money Order) to add the payment to their total. The amounts received to the left will automatically adjust as payments are added. |
| » | Use the <-- button on the keypad as a backspace (deleting the previous number entered). |
| » | To clear the keypad display click Clear Display. |
| » | By simply clicking one of the four (4) payment options (Cash, Check, Credit Card, or Money Order) without entering an amount, automatically assumes the transaction total was received. |
| » | To clear any of the amounts received simply click one of the four (4) clear options (Clear Cash Received, Clear Checks Received, Clear Credit Cards, or Clear Money Orders). |
| » | As payments are received the Amount Still Due will automatically adjust. The box will turn green when the total has been received and/or change is due to the customer. |
| » | Click Cancel Payment to clear any amounts received and return to the previous Misc Sale window. |
| » | When all payments have been received, click Process [Enter]. |
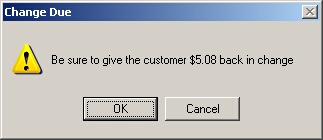
| » | If change is due, a pop-up will appear reminding you give the customer their change. |
| » | Click OK to confirm you gave the customer their change. |
| » | Click Cancel to return to the cash out window to adjust their payment information. |
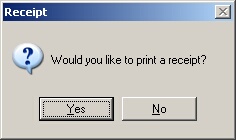
| » | Click Yes to print the customer a receipt. |
| » | Click No to skip printing the receipt. |
Page url:
http://www.ksoftcorp.com/help/index.html?using_pos_style_1.htm


