Lots of information can be edited at any time through the Edit Customer window.
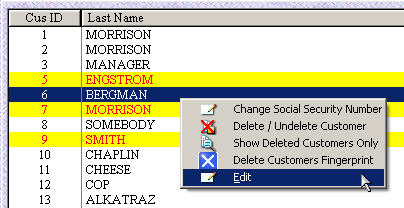
| » | Select the customer is the Customer Listing window and do one of the following: |
| » | Click the Edit button  in the lower right corner of the Customer Listing window. in the lower right corner of the Customer Listing window. |
| » | Double-click the record. |
| » | Right-click and select Edit. |
Edit: General Information Tab
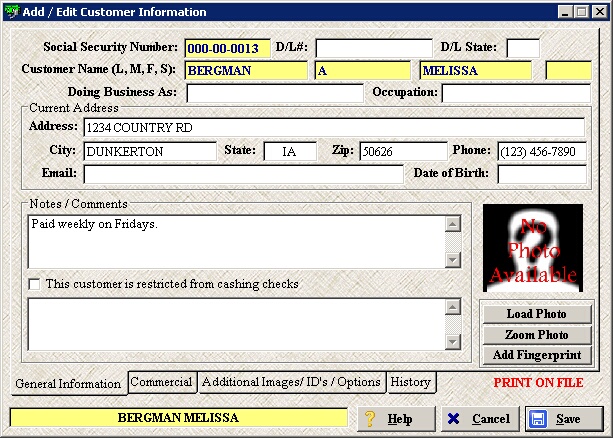
| » | All fields on the General Information tab are editable except for the customer's Social Security Number. To view complete details on how to change a customer's SSN, please see Edit SSN. |
| » | Doing Business As refers to the customer's Company Name if they are self employed. |
| » | To restrict a customer from cashing checks, check the This customer is restricted from cashing checks box. |
| » | Click Load Photo to load a primary photo from a file on your computer, a webcam, or a scanner. |
| » | Click Zoom Photo to enlarge the photo and use the zoom feature. |
| » | Click Add Fingerprint to add the customer's fingerprint. To view complete details on how to add a customer's fingerprint, please see Add/Delete Fingerprint. |
| » | If the words PRINT ON FILE appear below the Add Fingerprint button, then the customer currently has a fingerprint loaded into the system. To view complete details on a customer's fingerprint, please see Add/Delete Fingerprint. |
| » | Click Save only when completely done editing a customer as this will close the Edit Customer window. To continue editing, select one of the tabs towards the bottom (General Information, Commercial, Additional Images/ID's/Options, History). |
Edit: Commercial Tab
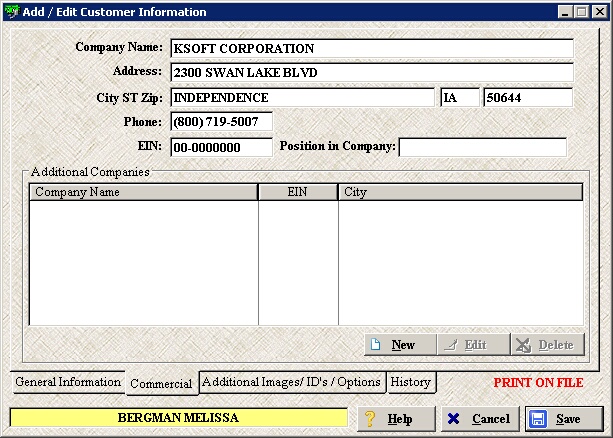
| » | All fields on the Commercial tab are editable information and contain information about a Commercial Customer. |
| » | This is not necessarily the customer's employer but the company they may be cashing a check for on their behalf. This will be who the check is payable to. |
| » | EIN stands for the Employer Identification Number or their Federal Tax Identification Number, and is used to identify a business entity. |
| » | If the words PRINT ON FILE appear in the lower right hand corner, then the customer currently has a fingerprint loaded into the system. To view complete details on a customer's fingerprint, please see Add/Delete Fingerprint. |
| » | Click Save only when completely done editing a customer as this will close the Edit Customer window. To continue editing, select one of the tabs towards the bottom (General Information, Commercial, Additional Images/ID's/Options, History). |
| » | Use the New, Edit, and Delete buttons to manage multiple companies. |
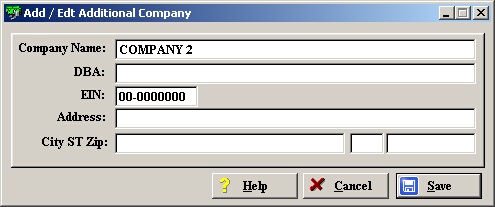
| » | Click the New or Edit button to add/edit additional companies. |
| » | DBA stands for Doing Business As. This could be the customer's Company Name if they are self employed. |
| » | Click Save to save the changes and return to the previous screen. |
Edit: Additional Images/ID's/Options Tab
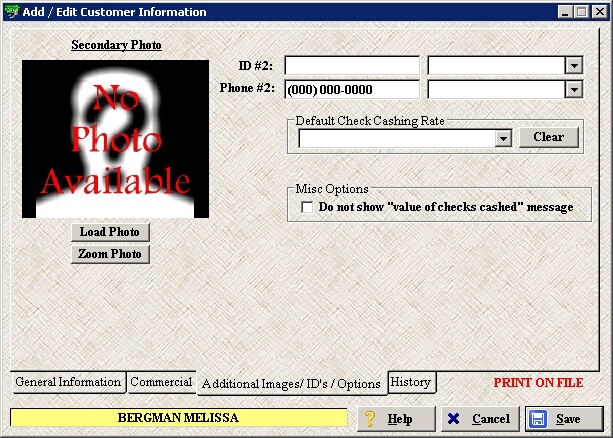
| » | All fields on the Additional Images/ID's/Options tab are editable. |
| » | You may enter in an ID #2 number and select the type of ID from the drop-down on the right. The drop-down is pre-populated from the ID Types list. To add/edit ID types, please see ID Types. |
| » | You may enter in an Phone #2 number and select the type of phone from the drop-down on the right. The drop-down is pre-populated from the Phone Types list. To add/edit Phone types, please see Phone Types. |
| » | To give this customer a default check cashing rate, select a rate from the Default Check Cashing Rate drop-down. To add/edit Check Cashing Rates, please see Check Cashing Rates Setup. |
| » | Use the Clear button to clear a current check cashing rate and set the default rate to none. |
| » | If you have the Display Customers Accumulated $$ of Checks setting set in the Check Cashing Setup, you may override that setting on a case-by-case basis by checking the Do not show "value of checks cashed" message box. |
| » | Use the Load Photo button to load a secondary image from either a file on your computer, a webcam, or a scanner. |
| » | Click Zoom Photo to enlarge the photo and use the zoom feature. |
| » | If the words PRINT ON FILE appear in the lower right hand corner, then the customer currently has a fingerprint loaded into the system. To view complete details on a customer's fingerprint, please see Add/Delete Fingerprint. |
| » | Click Save only when completely done editing a customer as this will close the Edit Customer window. To continue editing, select one of the tabs towards the bottom (General Information, Commercial, Additional Images/ID's/Options, History). |
Edit: History Tab
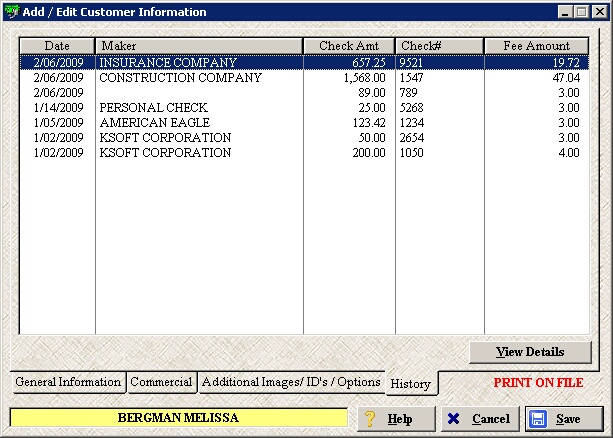
| » | The History tab contains no editable information. |
| » | This tab only lists the customer's check cashing history. |
| » | If the words PRINT ON FILE appear in the lower right hand corner, then the customer currently has a fingerprint loaded into the system. To view complete details on a customer's fingerprint, please see Add/Delete Fingerprint. |
| » | Click Save only when completely done editing a customer as this will close the Edit Customer window. To continue editing, select one of the tabs towards the bottom (General Information, Commercial, Additional Images/ID's/Options, History). |
| » | To view the details of any record in the list, either double-click the record or select the record and click the View Details button. See below for complete details. |
Check Details

| » | The details window shows the customer's name, the rate they were charged along with the employee who cashed the check. |
| » | Also displayed is the check payee and their phone number at the time of the transaction along with the current information (allows you to see if the company information has changed). If RESTRICTED appears next to the phone number in the Issued By Current Information section, this indicates that this check payee has been restricted for one reason or another. |
| » | If the check has been deposited the Deposit Information (date, time, and bank) will be displayed. |
| » | If the check was returned by the bank, the Check Returned by Bank box will be checked and the Date of NSF will be filled in with the date the check was marked as returned. The reason for the return and amount due will also be displayed (if any). |
| » | A check can be removed from the Returned Checks list by un-checking the Check Returned by Bank box. |
| » | The Check Returned by Bank button on this screen is not intended to be used to mark a check as returned. To view the returned check process, please see NSF Highlighted Record. |
| » | Click the Make Payment button to make a payment on returned check (continue below to see details). This can also be done through the Check Cashing Register. |
| » | The Re-Deposit Details section is used for reporting purposes only. Editing these fields will edit the information found on the Returned Item Listing report. |
| » | The Transaction Amounts section displays information pertaining to the check such as the face value of the check along with the fee charged and any other deductions. It then does the calculations and displays the actual amount that was given to the customer after the fee and deductions. |
| » | If you are using a check scanner and there is an image of this check available you can click either the View Check Front or View Check Back button to see the image. |
| » | Any comments that have been left on this check will be displayed in the Comment box. This field can be edited from here as well. |
| » | The Check # or Reference # appears at the bottom of the screen. |
| » | Click Save to save and return to the previous window. |
| » | Click Cancel to return to the previous window without saving. |
Make Payment

| » | Click the Make Payment button to make a NSF check payment. |
| » | Select the Payment Method and then fill in the Payment Amount. |
| » | Click Process to continue with the payment. |
| » | Click Cancel to cancel the payment and return to the previous screen. |
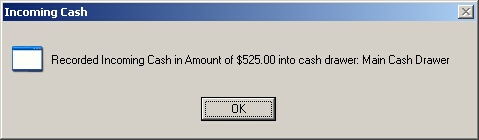
| » | Click OK to confirm the payment. |
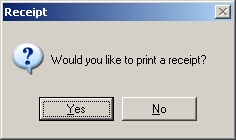
| » | Click Yes to print a receipt. |
| » | Click No to skip printing a receipt. |
Page url:
http://www.ksoftcorp.com/help/index.html?edit_existing_customer.htm


